NuGet Packaging: My First Package
A quick and straightforward introduction to how to package your .NET project as NuGet package
Dec 2, 2023
Engineering

NuGet Packaging Series
This article is part of the Creating NuGet Packages series. You can find the complete list of articles in the series at the end.
Introduction
This article is the first in a series about packing your .NET projects into NuGet packages. While NuGet packaging may appear straightforward initially, delving into the documentation reveals undocumented and scattered information that can make the process time-consuming and frustrating.
Throughout the series, I will try to cover and condense all the important parts into straightforward articles. So, let's dive in...
NuGet Packages
NuGet packages are packaged .NET projects prepared for distribution and reuse. They encapsulate code and other resources, making sharing and managing external dependencies within .NET projects easier. A NuGet package is essentially a ZIP archive with a .nupkg extension.
Creating and publishing your own NuGet package is an excellent method for distributing and reusing your .NET libraries. Once built, you can release it to your personal or company's repository or even an official NuGet.org repository that benefits the entire .NET community.
Best Practices
When distributing your libraries or tools through NuGet, following specific naming conventions and best practices for the metadata is essential. This ensures a clear and consistent experience for consumers of your package.
Here's a guide to the most common practices and rules for NuGet packaging and its metadata:
NuGet Project Format
The NuGet project format refers to the structure and organization of the files and metadata within a project that is intended to be packaged as a NuGet package.
Over the years, the NuGet project format has evolved alongside the .NET ecosystem, leading to a transition from the traditional packages.config and .nuspec files to the more modern and streamlined PackageReference and SDK-style projects.
This chapter delves into the nuances of these formats and provides insights into effectively structuring a NuGet project.
Traditional NuGet Project Format
Traditionally, NuGet projects (in .NET Framework) relied on a packages.config file to manage dependencies and a .nuspec file to define package metadata.
packages.config
This file lists all NuGet packages and their respective versions on which the project depends.
It enables NuGet to restore and manage project dependencies.
.nuspec
A manifest file that contains metadata about the package, such as its name, version, description, dependencies, and more.
It’s crucial for both creating and consuming the package.
Modern NuGet Project Format (SDK-Style)
The modern (for .NET Core), or SDK-style project format, streamlines the NuGet packaging process, making it more integrated and less verbose.
SDK-Style Project:
The new project format is based on the Software Development Kit (SDK) style, simplifying the project file structure and directly integrating NuGet functionalities into the project file.
It replaces
packages.configand.nuspecfiles by managing dependencies and package metadata directly within the project file (.csproj,.vbproj, or.fsproj).
PackageReference:
Dependencies are now managed using
PackageReferenceelements directly in the project file, eliminating the need for apackages.configfile.PackageReferenceprovides a more straightforward way to manage NuGet dependencies, making it easier to specify, restore, and update package versions.
Integrated Package Management:
NuGet package information, including versioning, authors, tags, and other metadata, can now be specified directly within the project file.
This integration simplifies the packaging process and reduces the number of files needed to define a NuGet package.
Advantages of SDK-Style Project Format
Simplified Project File: The SDK-style format simplifies the project file, making it easier to read and maintain.
Centralized Management: Having a single file to manage both project and package metadata simplifies the management and versioning of NuGet packages.
Transitive Dependencies: Automatically manages transitive dependencies, reducing the manual work involved in resolving dependency conflicts.
Transitioning to SDK-Style
Transitioning to the SDK-style project format is recommended to utilize the streamlined process and integrated NuGet management. This transition can typically be accomplished with a few changes to the project file and migrating from packages.config to PackageReference.
The evolution from traditional to SDK-style NuGet project formats represents a significant step towards a more integrated and simplified packaging process. By adopting the SDK-style project format, developers can manage NuGet packages more efficiently, contributing to a more robust and manageable .NET ecosystem.
It is highly advisable to use SDK-Style packaging since it is the preferred way prescribed by Microsoft by using an IDE such as Visual Studio/Rider or by using dotnet CLI
PackageId (Unique Package Identifier)
The unique package identifier (name). This unique package identifier (often called the "PackageId") should be human-readable. Developers use this name when they search for or install packages using NuGet.
The default value is $(AssemblyName) - package assembly name; if not set.
Here are some guidelines and best practices for naming your package:
Descriptive and Clear: The name should be descriptive enough to give developers a good idea of what the package does. For example,
Newtonsoft.Jsonindicates that the package relates to JSON functionality and is provided by Newtonsoft organization.Avoid General Terms: Try not to use overly general terms. For instance, if you have a library that provides advanced mathematical functions, naming it
MathLibraryis too generic. Instead, you might use something likeAdvancedMathLiborJohnsMathFunctions.Namespacing: If creating a series of related packages or representing a company, consider using a prefix. For example, Microsoft packages often start with
Microsoft.likeMicrosoft.AspNetCore.Mvc.Avoid Special Characters: It's best to avoid special characters, spaces, and hyphens in the package name. Stick to alphanumeric characters.
Case Sensitivity: NuGet package IDs are case-insensitive, but the original case is preserved. It's a good practice to use PascalCase for package IDs.
Consistency: If you publish a suite of related packages, maintain a consistent naming scheme. This can help users identify your packages as part of a larger suite.
Check for Existing Packages: Before deciding on a name, you might want to check NuGet.org to ensure there isn't already a popular package with the same or similar name.
Avoid Using
System: It's recommended not to prefix your package IDSystemunless you're from Microsoft. This avoids confusion with official .NET libraries.
Important!
Remember, once you've chosen a name and published your package, you shouldn't change the package ID. If you need to change it, you'll effectively create a new package, and users will not receive updates unless they switch to the new package name.
ID Prefix Reservation on nuget.org
ID prefix reservation is a feature on nuget.org that lets you reserve a specific prefix for your package IDs. This feature aims to assure users that their packages are from a trusted source and give package authors an opportunity to showcase their work.
What is a Prefix?
The prefix is a crucial component of the package ID as it signifies its origin or grouping. It is a shared element among all packages from the same publisher or within the same suite.
For instance, let's consider an organization named MyCompany that selects the prefix MyCompany. Consequently, all packages originating from this organization will bear the following format (example):
MyCompany.ProjectName.Abstractions
MyCompany.ProjectName.Models
MyCompany.ProjectName.Infrastructure
and similar. Basically, it's the first part of the namespace.
Best Practices and Rules for ID Prefix Reservation:
Verification: Before reserving an ID prefix, you must verify ownership of the prefix through a domain verification process on nuget.org.
Prefix Selection: Choose a prefix representing your organization or the suite of packages you are distributing. This prefix will be part of your packages' public identity.
Consistency: Once a prefix is reserved, maintain consistency in its use across all your packages to ensure clarity and recognizability.
Documentation: Clearly document using the reserved prefix in your project documentation to help users understand its significance.
Adherence to nuget.org Policies: Ensure that your use of the reserved prefix adheres to the policies and guidelines set forth by nuget.org. This includes avoiding any misleading implications of official or endorsed status and using the prefix in a manner that is consistent with nuget.org’s brand and reputation.
By following these naming conventions and ID prefix reservation practices, you contribute to a clean, understandable, and trusted ecosystem on nuget.org and ensure that users can easily find, recognize, and trust your packages.
Consider selecting a NuGet package name with a prefix that meets the prefix reservation criteria set by NuGet.
Metadata
NuGet package metadata is a descriptive and functional manifest for packages distributed through the NuGet ecosystem. This metadata includes crucial information about the package, such as its name, version, authors, dependencies, and more. It not only identifies the package but also guides its interaction with projects that consume it.
Utilization via Integrated Development Environments (IDEs)
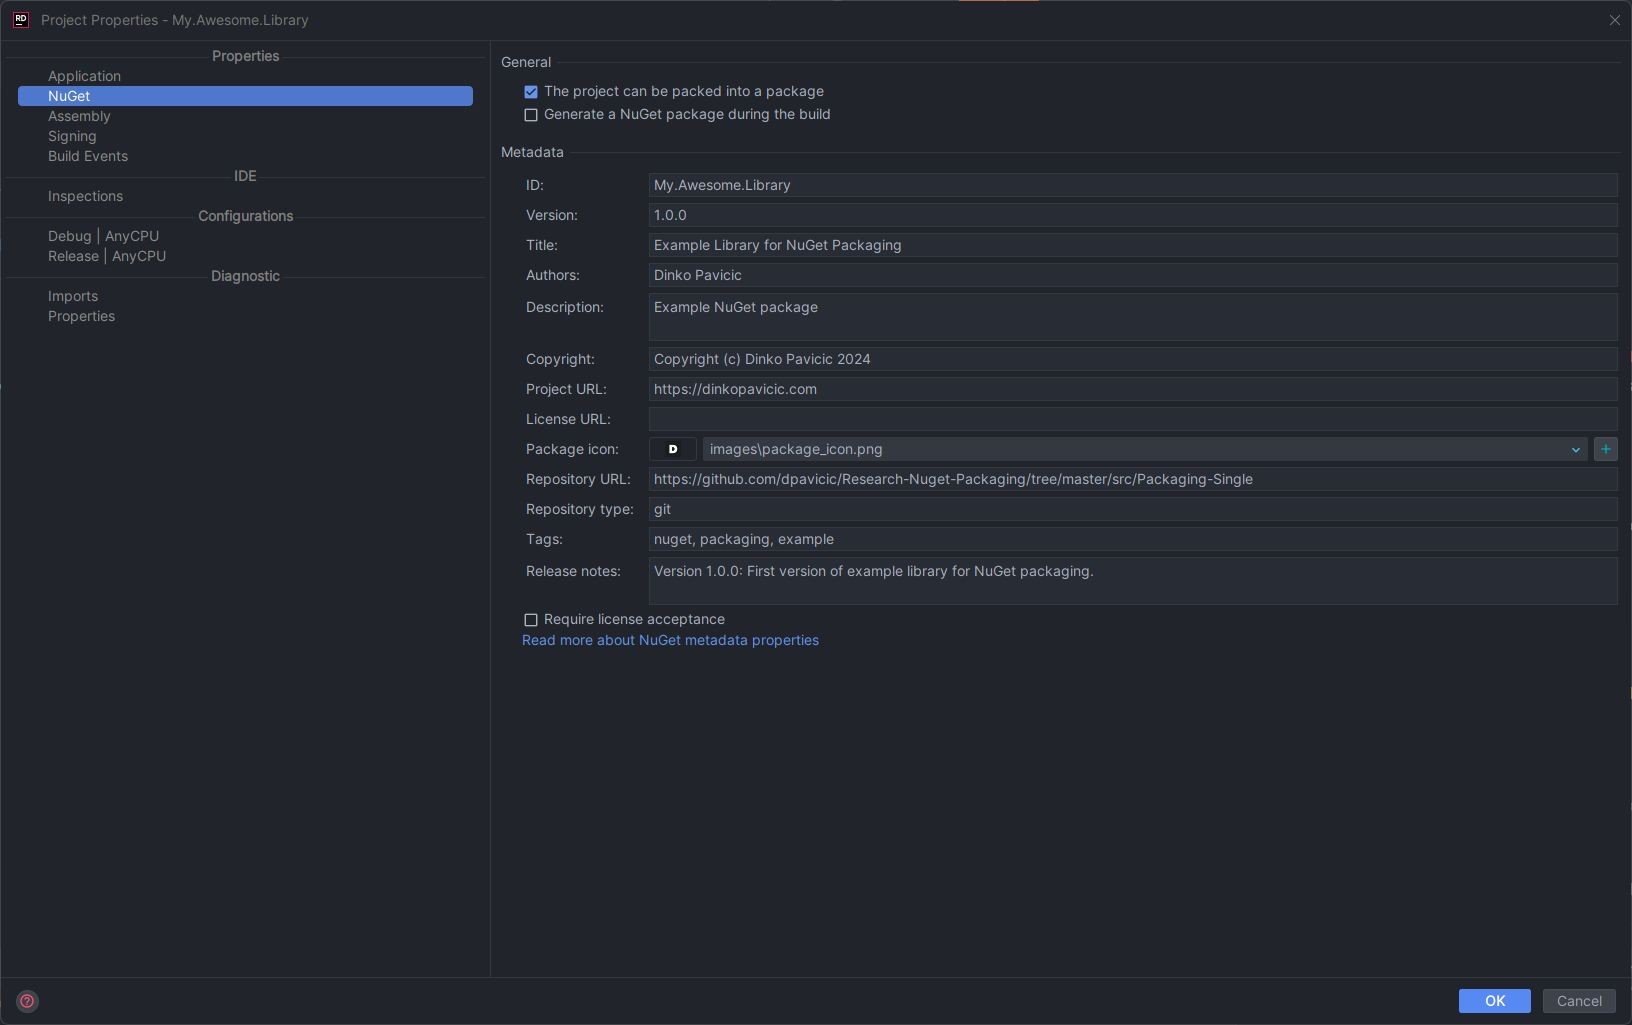
Integrated Development Environments (IDEs) like Visual Studio or JetBrains Rider provide user-friendly interfaces for working with NuGet package metadata. Through these IDEs, developers can easily create, manage, and publish NuGet packages.
Visual Studio
In Visual Studio, the NuGet Package Manager UI allows developers to fill in metadata fields directly.
The "Pack" command in Visual Studio creates a NuGet package (.nupkg) based on the metadata provided.
Additionally, developers can manage package dependencies, target frameworks, and other configurations through the UI.

JetBrains Rider
Like Visual Studio, Rider provides a UI for managing NuGet packages and their metadata.
It also offers a dedicated tool window for working with NuGet, allowing developers to manage packages and their metadata seamlessly.
Manual Metadata Management via .csproj
Alternatively, developers can manage NuGet package metadata by manually editing the project file (.csproj).
Package metadata can be specified directly within the
<PropertyGroup>element of the .csproj file using various XML tags, such as<PackageId>,<Version>,<Authors>, and more.This method provides a straightforward, text-based approach to managing package metadata, which can be particularly useful in automated or scripted scenarios.
Additionally, manual editing of the .csproj file allows for a finer level of control, especially useful in complex or non-standard configurations.
Whether managed through an IDE or manually via the .csproj file, NuGet package metadata is fundamental to creating, distributing, and managing NuGet packages. Its accurate and thoughtful specification is essential for ensuring that packages are correctly identified, versioned, and integrated within the .NET ecosystem.
Essential Metadata
This section will guide you through the necessary and recommended metadata properties for most NuGet packages. So, let's start...
Title
By using the Title property, a user-friendly package title can be set to be displayed in UIs like nuget.org and the Package Manager in Visual Studio or other IDEs like Rider.
The default value is $(PackageId) if not set.
For example, in your .csproj, this would look like this:
Version
Use the PackageVersion property to set the package version. Adhere to Semantic Versioning (SemVer) when versioning your packages. SemVer uses a three-part version number: Major.Minor.Patch[-prerelease]. For example: 1.0.0, 1.0.0-beta, or 1.0.0-beta-00456.
It's crucial to ensure that your package's consumers understand the nature of changes between versions.
Publish a package as a pre-release package if it is non-stable or a preview. You can learn more about pre-release packages here.
The default value is Version if not set.
For example, in your .csproj, this would look like this:
Authors
Include the author or authors' names as a comma-separated list using the Authors property. According to the Microsoft guidelines, if your NuGet.org username is "jdoe," using "Jane Doe" for the author field can help consumers recognize you as an author.
If your organization's NuGet.org username is "MyCompany," using "My Company" may be more recognizable and inspire consumer trust.
The default value is the Username of the current user.
For example, in your .csproj, this would look like this:
Description
Including a brief description using the Description property (up to 4000 characters) of your package is highly recommended. Package descriptions are crucial in NuGet search results. They are often the first thing potential users consider when deciding if a package meets their requirements.
The default value is "Package Description" if not set.
For example, in your .csproj, this would look like this:
Copyright
The Copyright metadata property is to define the copyright notice details for the package. Use it in the format: Copyright (c) <name/company> <year>.
A copyright notice shows that your work cannot be copied without permission. Adding a copyright notice to your package is simple and won't cause any harm. Here's an example:
Copyright (c) MyCompany 2024
The default value is empty if not set.
For example, in your .csproj, this would look like this:
License
There are two ways to set the license information about the package. Either by using PackageLicenseExpression or PackageLicenseFile properties.
License expression is a good choice for open-source packages, but if your package is NOT open-source, you would need to consider packing the license file using the PackageLicenseFile property.
PackageLicenseExpression
This is simply the name of the license —for example, MIT. For example, in your .csproj, this would look like this:
PackageLicenseFile
One can use a feature to pack a license file if the license expression is insufficient. To pack a license file, use PackageLicenseFile to set the package path from its root. Ensure the file is in the package. For example, in your .csproj, this would look like this:
Require License Acceptance
If PackageRequireLicenseAcceptance property is set to true, and anyone who tries downloading your package will be prompted to accept the set license.
The default value is false if not set.
For example, in your .csproj, this would look like this:
Project Url
If you have a web page for your project, this is where you can provide the URL using the PackageProjectUrl property. The link should lead to a relevant project, repository, or company website. Your project site should contain all the information that users need to know about your package and will likely be where users find documentation.
The default value is empty if not set.
For example, in your .csproj, this would look like this:
Repository URL and Type
The RepositoryUrl and RepositoryType properties represent the URL and type of the package repository. The URL is where all the package code is stored and built from, while the type indicates the kind of repository the URL points to, like "git."
The default value is empty if not set.
For example, in your .csproj, this would look like this:
Source Link
Microsoft has a technology called Source Link that allows developers to debug the source code of .NET assemblies from NuGet. This can be useful for adding source control metadata to your NuGet package and making debugging easier.
Source Link automatically adds the Repository URL and Repository Type to the package metadata. It also includes the specific commit associated with your package version.
Icon
Use the PackageIcon property to set the package icon. Setting an icon for your package to make it visually distinct is a good idea. This can be a specific image for the package or one representing your brand.
The default value is empty if not set.
The recommended size for the icon is 128x128 pixels, and it should have a transparent background (PNG) for optimal viewing. If the icon is larger, NuGet will automatically resize it.
For example, in your .csproj, this would look like this:
README
It is advisable to include a README.md file along with your package describing your package functionality and other important information.
The default value is empty if not set.
When packing a readme file, use the PackageReadmeFile property to specify the package path relative to the root. Also, ensure that the file is included in the package. Only Markdown files with the extension .md are supported.
For example, in your .csproj, this would look like this:
Tags
Adding tags with the PackageTags property, separated by semicolons to your package, can improve its discoverability. Tags are considered in the search algorithm on NuGet.org and can be particularly useful for terms that are not included in the Package ID but are still relevant.
If you created a package for the MongoDB repository pattern, I would include, for example: "MongoDB; repository; database."
For example, in your .csproj, this would look like this:
Release Notes
Including release notes is a good idea. They inform users about the changes made in each update of your package. NuGet package metadata, including release notes, is version-specific. When you release a new version of a package, it's standard practice to provide release notes for that particular version. However, the <PackageReleaseNotes> tag in the .csproj file only holds the release notes for the current version being packaged. It doesn't inherently link or carry forward release notes from previous versions. Here’s how you might handle release notes across multiple versions:
According to Microsoft documentation, there is no specific format for release notes. However, it is recommended to include the following information:
Breaking changes
New features
Bug fixes
You can also provide a link to the relevant file if you already track release notes or a changelog in your repository.
Manual Aggregation
You could manually aggregate release notes from previous versions and include them in the <PackageReleaseNotes> tag when preparing a new version.
External Documentation
Rather than including all release notes within the .csproj file, you could maintain a separate CHANGELOG file in your project repository and provide a link to this file in the <PackageReleaseNotes> tag.
In the End
After all of this, your .csproj file should look something like this:
All Available Metadata Properties
If you want to learn more in-depth, here is a comprehensive list of all available properties that can be used for packaging a NuGet, in addition to the essential metadata properties we covered above:
NuGet pack and restore as MSBuild targets | Microsoft Learn
Validation
Package validation tooling is a valuable resource for library developers. It ensures that packages are consistent and properly structured. This tooling offers several checks to ensure the quality of the package:
No Breaking Changes: It validates that no changes could break existing functionality when transitioning between different versions of the package.
Consistent Public APIs: It verifies that the package maintains the same set of public APIs across all runtime-specific implementations. This ensures that developers using the package can rely on consistent behavior regardless of the runtime environment.
Identifying Applicability Holes: It helps developers identify any gaps or limitations in the package's applicability. By catching these issues early on, developers can address them and ensure that the package meets the needs of its users.
With these checks in place, package validation tooling empowers library developers to create high-quality packages that are reliable and easy to use.
Package Validation is enabled by adding EnablePackageValidation property to .csproj:
If you have previously published versions of the package, you can validate the API for breaking changes using PackageValidationBaselineVersion. This will check for API changes between the new and old package versions.
Reproducible Builds
Including debug symbols and/or a SourceLink is highly recommended, especially for open-source packages. By including these, users can easily debug the code of your package, navigate to specific parts of the source code, and ensure that the .dll is built from the source code on GitHub.
To automate all of this, we will use the DotNet.ReproducibleBuilds library. See more about it here.
This package (from its documentation) sets the following properties:
PublishRepositoryUrl= trueEmbedUntrackedSources= trueDebugType = embedded. You can specifyportablein your project, but you'll need to upload that.snupkgfile too.IncludePackageReferencesDuringMarkupCompilation=true(enables a fix for WPF)ContinuousIntegrationBuild = trueon CI systems
It also adds SourceLink dependencies for all repo types (the right one will be used automatically).
To enable reproducible builds, add the DotNet.ReproducibleBuilds package to your project. The resulting changes in your .csproj file should look like this:
Packaging
Now that everything is in place, let's package our library. There are two methods to accomplish this: using IDEs like Visual Studio or JetBrains Rider or utilizing the command line with the dotnet pack command.
While packaging with an IDE is more convenient, the command line approach offers more flexibility and can be integrated into CI/CD setups.
Check if everything is in place
Check Metadata: Ensure your
.csprojfile has all the necessary metadata either by checking in the IDE or directly in .csprojCheck if
README.mdis set: Packager will warn if you don't have a readme file in your project. Remember, the supported format is markdown only.Clean Up: Ensure your library has no unnecessary files or binaries. Only keep the essential code and assets.
Packaging with IDE
If we configure the IDE to generate a package with each build, the resulting .nupkg file will be stored in the project's bin/Release/net-version or bin/Debug/net-version directories.
Visual Studio

JetBrains Rider

Packaging with dotnet pack Command
While packaging with an IDE is convenient, the real power lies in utilizing the dotnet pack command. This command is an essential tool in the .NET Core ecosystem for bundling code into a NuGet package (.nupkg file).
This command operates on the project file (.csproj) or a .NET solution file (.sln), packing projects into NuGet packages that can be distributed and consumed.
After all is set, run the following command in the project root to create the NuGet package:
dotnet pack --output ./nupkgs -c Release
This will build the project in Release settings and create a *.nupkg file in the nupkgs directory of the project you are packing. In our case, the filename will be: My.Awesome.Library.1.0.0.nupkg (packager automatically suffixes with version info)
Other dotnet pack Command Functionalities
dotnet pack command has a multitude of extra functionalities. Here's a comprehensive breakdown of how to utilize the dotnet pack command effectively:
Basic Usage
The simplest use-case for the dotnet pack command is to navigate to the directory containing the .csproj file of your project in the terminal and execute the following command:
dotnet pack
This will generate a NuGet package (.nupkg file) in the default output directory, typically bin/Debug or bin/Release, depending on your configuration.
Specifying Configuration
You can specify a configuration for packing using the --configuration (or -c) option, like so:
dotnet pack --configuration Release
This command tells dotnet pack to use the Release configuration, which usually optimizes your code for performance and omits debug information.
Output Directory
To specify a different output directory, use the --output (or -o) option:
dotnet pack --output nupkg_directory
Including Symbols
If you want to create a symbols package alongside your NuGet package, use the --include-symbols option:
dotnet pack --include-symbols
Including Source
To include the source files in the symbols package, use the --include-source option:
dotnet pack --include-source
Setting Package Version
You can set the package version from the command line using the --version-suffix option, which is useful for creating pre-release packages:
dotnet pack --version-suffix preview
Packing a .NET Solution
If you have a .NET solution file (.sln) with multiple projects, you can pack all the projects into NuGet packages with a single command:
dotnet pack YourSolution.sln
Verbosity
You can control the amount of output displayed using the --verbosity option:
dotnet pack --verbosity detailed
Runtime
To specify target runtime(s) for the package, use the --runtime option:
dotnet pack --runtime win-x64
No Build
If you want to skip the build step and package the built binaries, use the --no-build option:
dotnet pack --no-build
The dotnet pack command, with its various options, provides a flexible way to create NuGet packages from your .NET projects. Understanding and utilizing these options can help streamline the packaging process, enabling a smoother distribution and consumption of your NuGet packages.
Inspecting the Package
Every Nuget package is actually a .zip file but with .nupkg extension. If you rename the package extension from .nupkg to .zip you can easily inspect its contents.
When renamed and opened, the structure should look something like this:
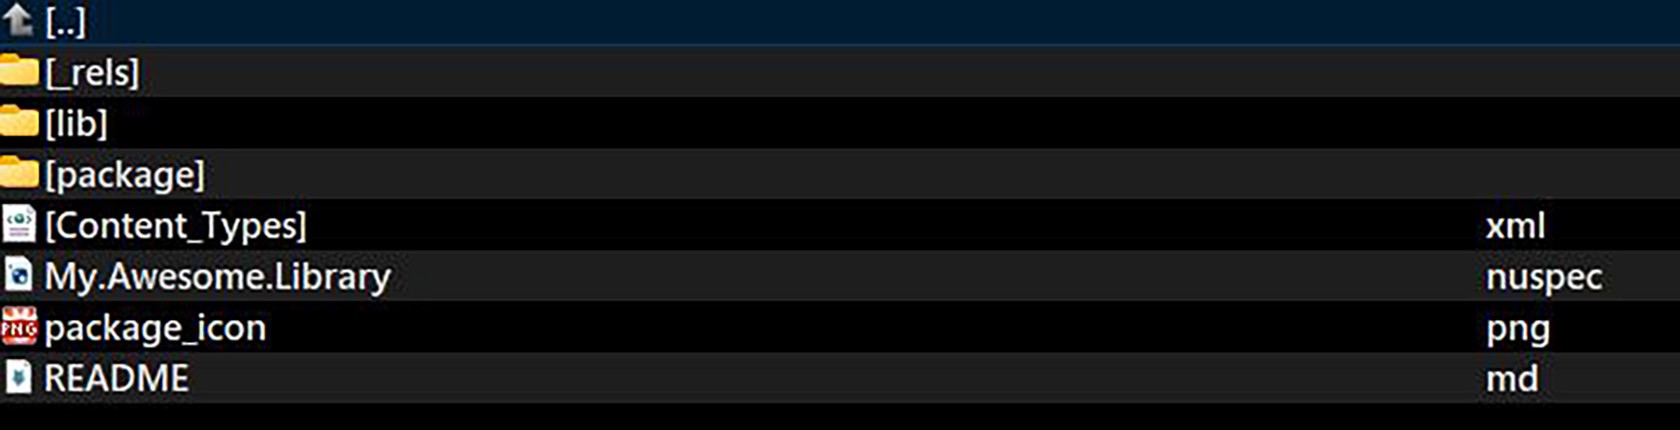
And in the lib/net7.0 directory, our two .dll files tell us that packaging multiple projects succeeded.

Nuget Package Explorer
There is also an app for exploring and packaging Nuget packages called Nuget Package Explorer. This nice application allows one to explore and even create Nuget packages from .dlls and other packageable files.
What Have We Learned?
That's it! Once familiar with it, creating and publishing NuGet packages can become a routine part of your development workflow. In this article, we learned:
What are NuGet packages
Which format to use for modern .NET
How to prepare the project for packaging
How to package the library
Example Project on GitHub
An example project for this article can be found here:
Knowledge Sources
If you want to learn more about NuGet packaging (since it's a really wide theme), refer to the links below:
Creating NuGet Packages Series
This article is part of the Creating NuGet Packages series. If you enjoyed this one and want more, here is the complete list in the series:
Happy Coding!


