NuGet Packaging: Bundling Multiple Projects with .nuspec
How to bundle multiple .NET projects into a single NuGet package using .nuspec manifest and nuget command line tool
Dec 4, 2023
Engineering

NuGet Packaging Series
This article is part of the Creating NuGet Packages series. You can find the complete list of articles in the series at the end.
Introduction
In the realm of .NET development, distributing libraries and applications as NuGet packages is a standard practice. There are scenarios where bundling multiple projects into a single NuGet package is desirable, especially when these projects share common dependencies or are part of a larger framework.
One prevalent method to achieve this bundling is by leveraging a .nuspec file. This article provides an in-depth look into this method, elucidating the process with examples to provide a clear pathway for bundling multiple projects into a single NuGet package using a .nuspec file.
Special Note 1: Modern .NET Packaging & Bundling Guidelines
In modern .NET practices, Microsoft generally discourages bundling multiple projects into a single NuGet package. Instead, the recommendation is to distribute each project as a separate package. This approach aligns with the principle of maintaining a clear separation of concerns and promoting a modular architecture, which in turn eases versioning, dependency management, and the update process.
However, there are special circumstances where bundling multiple projects into a single NuGet package may be warranted:
Tightly Coupled Projects: If the projects are tightly coupled, where changes in one project often require changes in others, bundling them can simplify versioning and deployment.
Atomic Deployment: In scenarios where it is crucial to ensure that all projects are deployed or updated atomically to prevent inconsistencies or errors, a single package can be beneficial.
Framework Distribution: If the projects constitute a framework where users are expected to use all parts cohesively, a single package could provide a streamlined consumption experience.
Internal or Controlled Distribution: In environments with controlled distribution, bundling might be a viable option where the ease of deployment outweighs the benefits of modular packaging.
It's essential to weigh the advantages and drawbacks in the context of your project's needs and adhere to best practices to maintain a well-architected, manageable, and scalable codebase.
Special Note 2: Way of Packaging in Modern .NET
In modern .NET Core, Microsoft generally discourages using the nuget CLI for packaging and instead advises developers to package libraries directly from .csproj files.
This approach is described in detail in the first article of the NuGet series.
Understanding .nuspec
A .nuspec file is a special type of file that serves as an XML manifest. This manifest contains important information and instructions for creating a NuGet package. Think of it as a blueprint that guides the nuget.exe pack command in creating the package.
The .nuspec file is made up of different elements, each with its own specific role in the packaging process. These elements provide metadata and content directives that define the structure and contents of the resulting package. By including these elements in the .nuspec file, you can control how your package is created and what it includes.
Overall, the .nuspec file plays a crucial role in the creation of a NuGet package. It acts as a central hub for all the necessary information and instructions needed to generate the package correctly.
Let's Make the .nuspec
To create NuGet packages using .nuspec, you'll need the nuget command line tool. You can always download the latest version of the CLI here. Once downloaded, add the CLI to your PATH to recognize it from the Terminal.
See more at Installing NuGet client tools | Microsoft Learn
Adding nuget CLI to a Path (Windows)
For the nuget CLI to work, you must add it to the PATH environment variable. There are two ways to do it:
Using System Properties
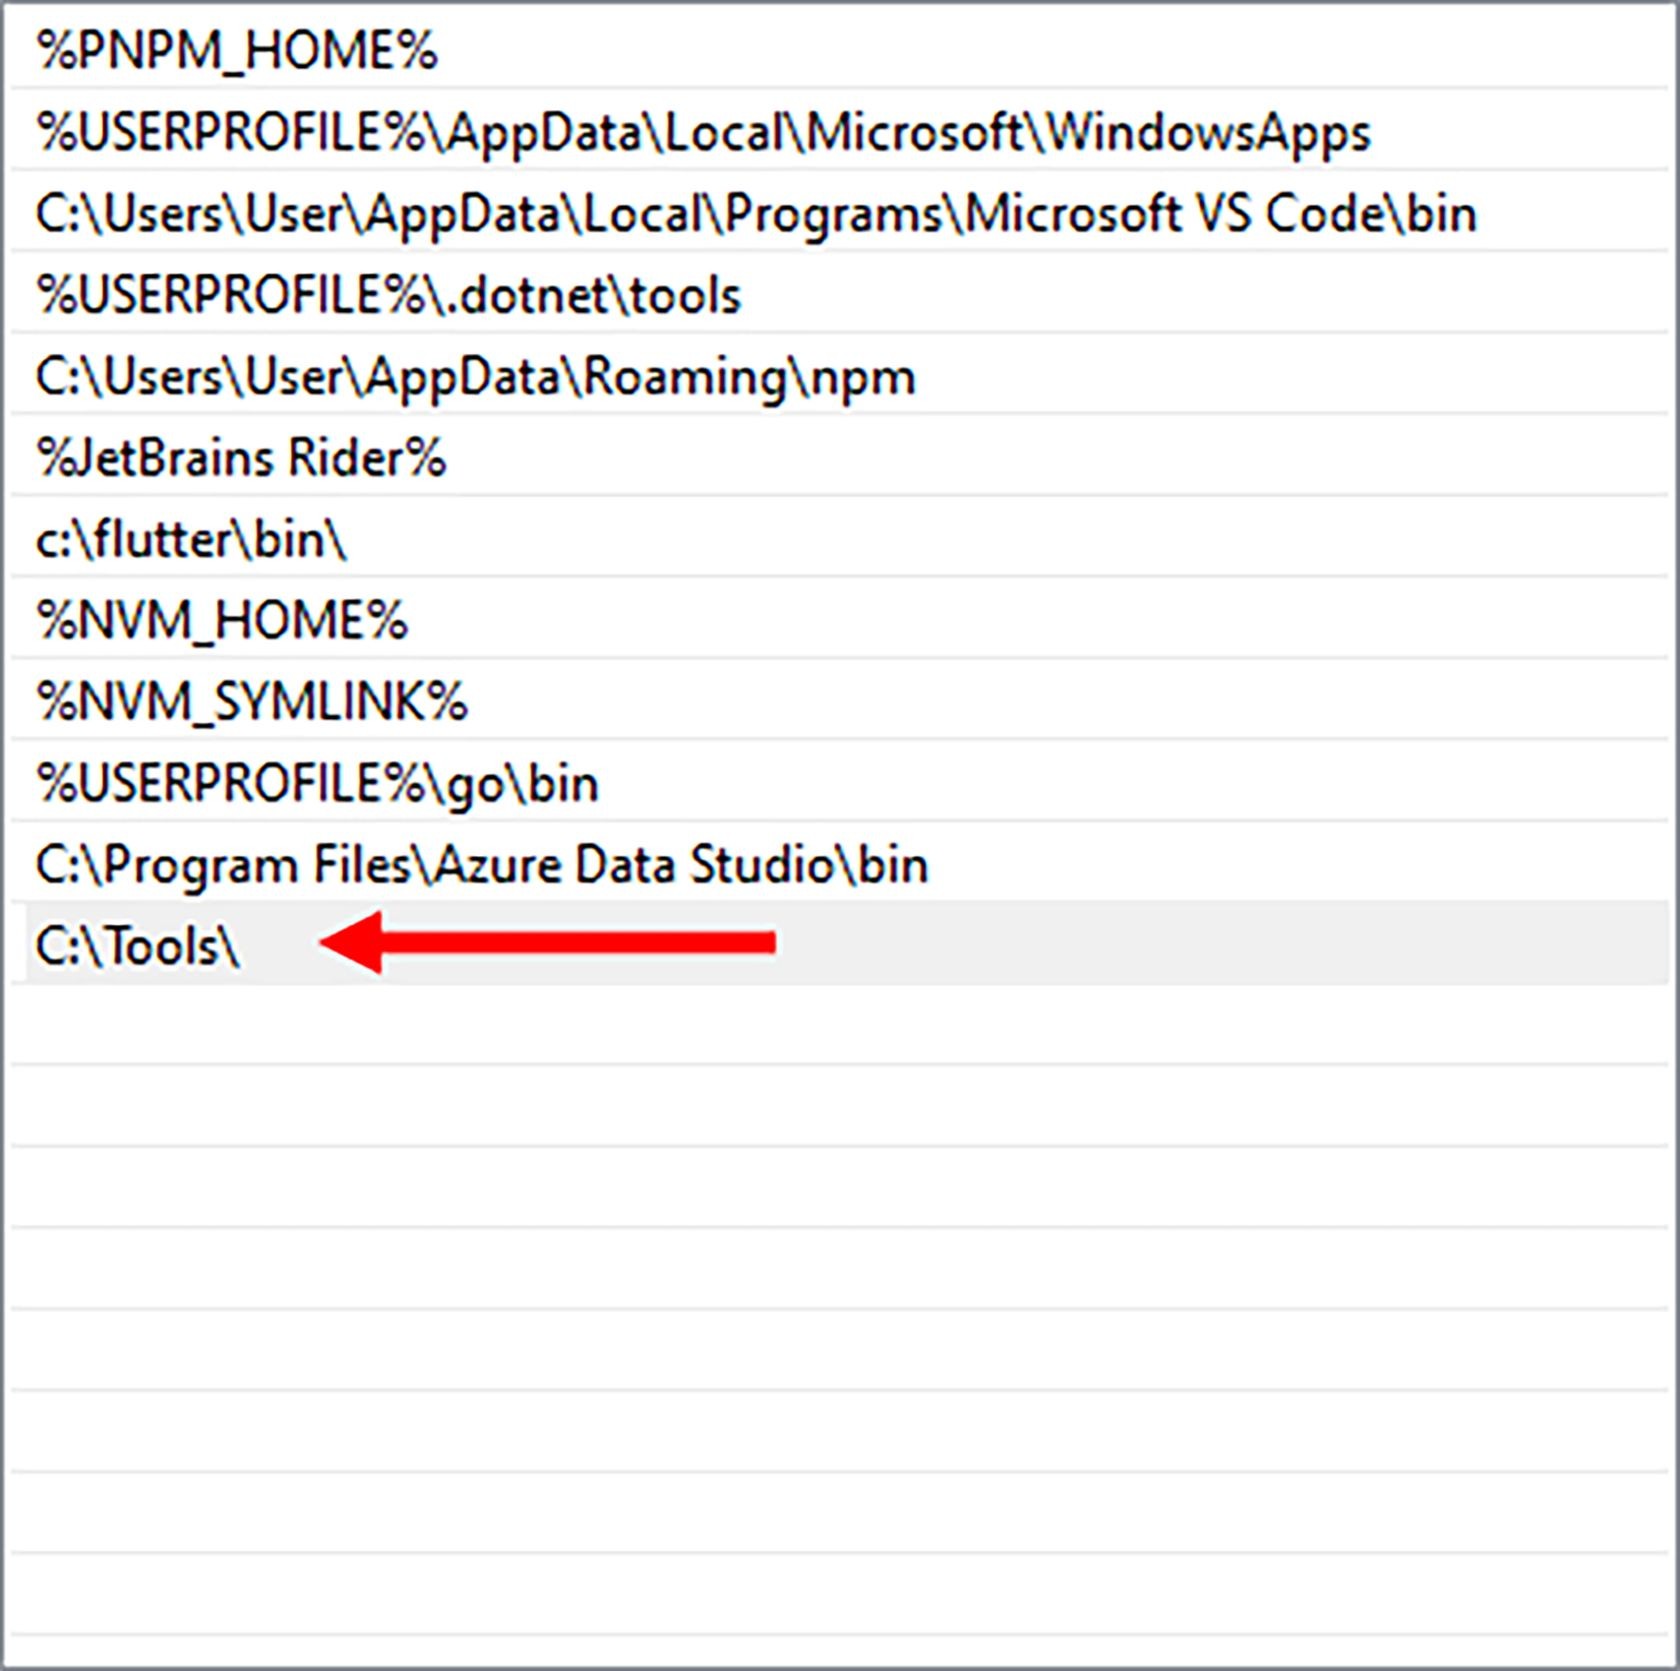
Open System Properties, and then under Environment Variables, find Path entry.
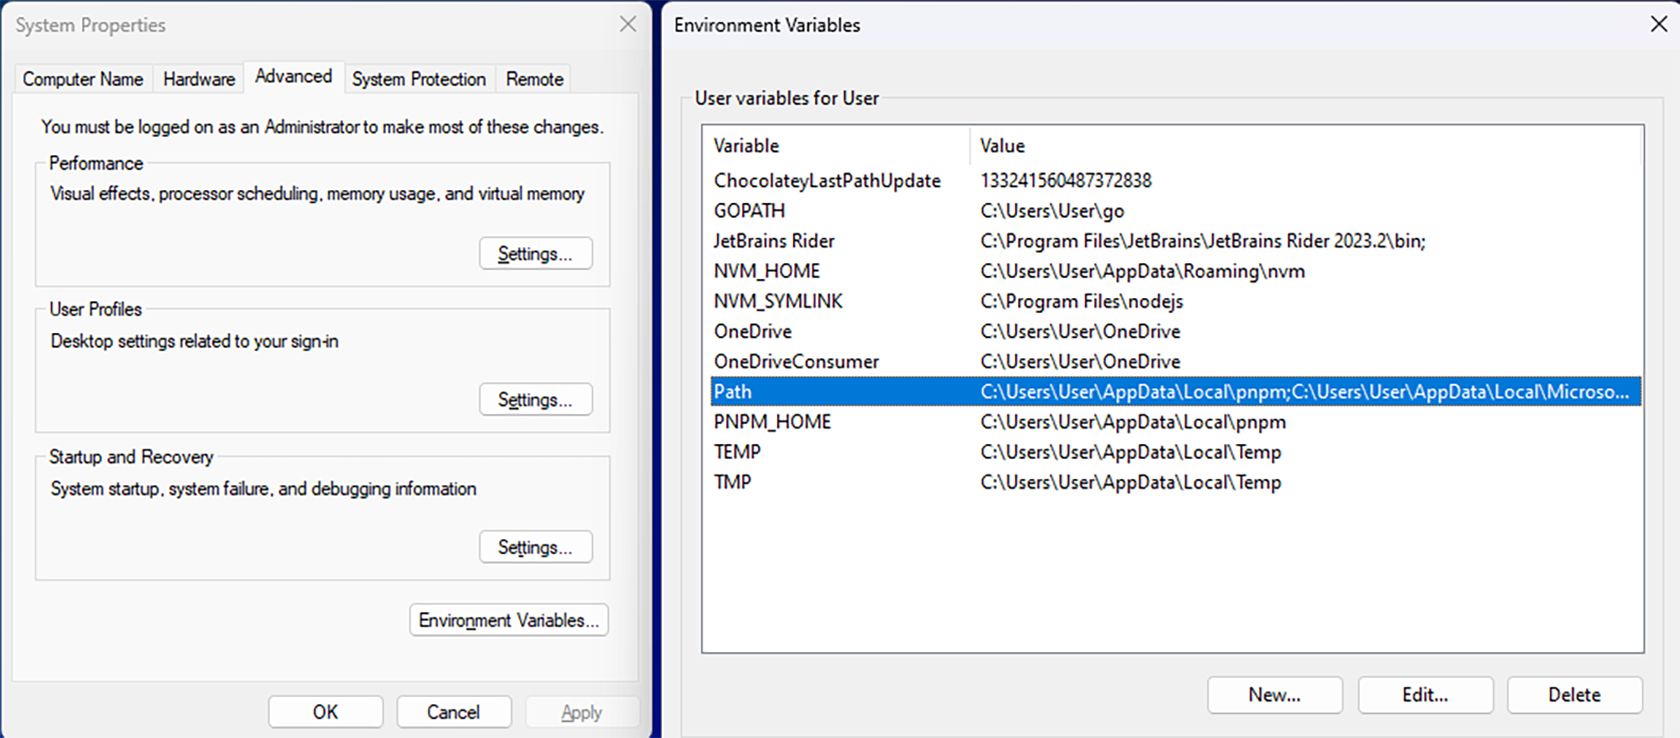
Then add the folder path where you copied
nuget.exe. In my case, it is inC:\Tools\directory.Next, close the Terminal window and reopen it. Now, when you type
nugetand press Enter, the nuget CLI description will be displayed.
From the Terminal
To add the folder path where you copied nuget.exe (in my case C:\Tools\ directory), follow these steps:
Open the Terminal window.
Type in the command:
setx PATH "%PATH%;C:\Tools\"and press Enter.
After executing this command, the folder path will be added to your system's PATH variable.
Create a .nuspec File
Create a new file with .nuspec extension within your solution directory, giving it a meaningful name, for instance, My.Package.Bundled.nuspec.
Alternatively, you can generate a .nuspec file template using the nuget spec command.
nuget spec My.Package.Bundled.nuspec
Defining Package Metadata
Populate the <metadata> element with essential information like id, version, title, authors, and description. The metadata for nuspec manifests is almost identical to those used when packing directly in .csproj, as discussed in a previous article.
A full comparison can be found here
Specifying Project Files
In this crucial step, we'll be specifying the files from the projects we wish to bundle together. This is done within the <files> element of the .nuspec file.
Enumerating Source Files
Under the <files> element, list the assemblies, content files, and other dependencies from each project you want to bundle.
Understanding Source and Target Attributes
The
srcattribute specifies the path to the file(s) in your project.The
targetattribute denotes the directory structure within the NuGet package where the files will reside.
The Complete .nuspec File
Here's how the complete .nuspec file looks with the project files specified:
With this complete .nuspec file, you have specified the essential metadata for the package and enumerated the project files to be included in the bundle.
This configuration ensures that the nuget.exe pack command will generate a NuGet package containing both My.LibraryA and My.LibraryB assemblies, along with any other files or dependencies you have listed under the <files> element.
Packaging the Projects
Executing the Pack Command
Utilize the nuget.exe pack command to generate the NuGet package based on the directives in the .nuspec file.
nuget pack My.Package.Bundled.nuspec -OutputDirectory nupkgs
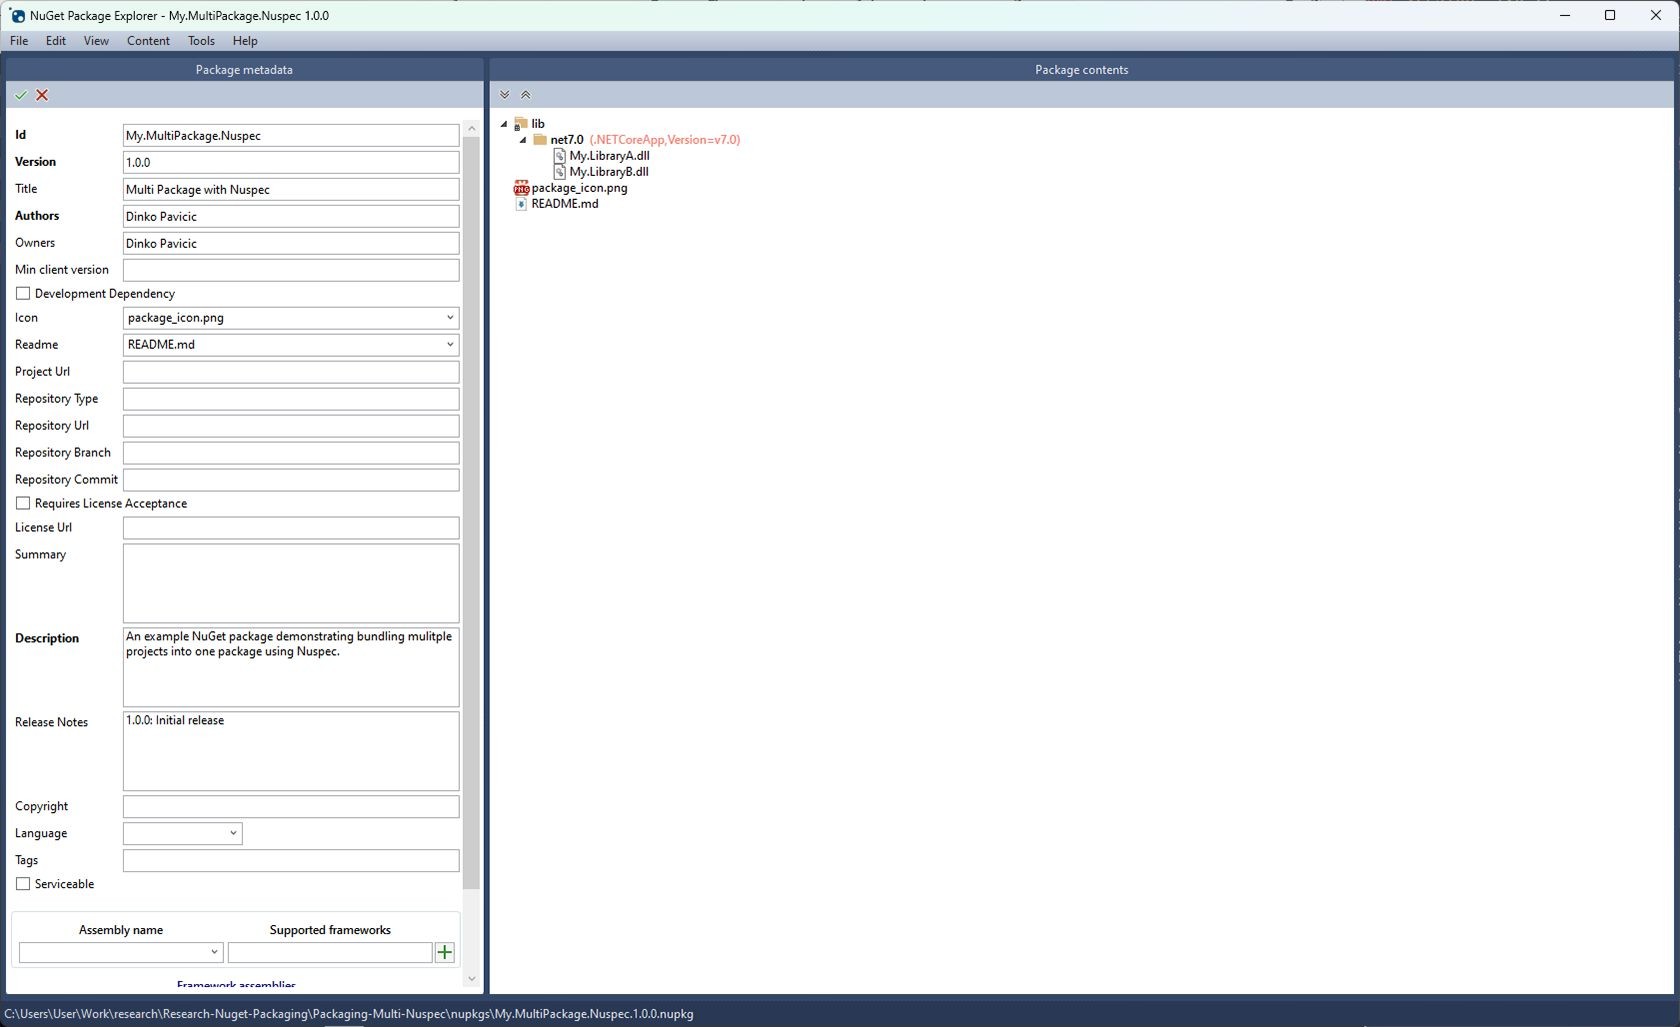
Inspecting the Generated Package
Upon successful execution, a .nupkg file (e.g., My.MultiPackage.Nuspec.1.0.0.nupkg) is created in the output directory (in our case nupkgs directory).
After the package is bundled, and as described in the first article, let's use the NuGet Package Explorer to inspect the package and ensure all desired projects and dependencies are correctly bundled.
If everything went smoothly, you should find both .dlls in the net7.0 directory within the package. Additionally, all properties of the package are correctly set as specified in the .nuspec manifest.
What Have We Learned?
Bundling multiple .NET projects into a single NuGet package using a .nuspec file is a meticulous yet powerful method. It provides a high level of control over the packaging process, ensuring the precise inclusion of projects and dependencies.
The steps explained here provide a strong basis for creating well-organized NuGet packages that contain multiple projects. This helps in the effective distribution and management of .NET libraries and applications.
In this article, we learned:
Why not, and why bundle multiple packages
Basics of nuspec manifests
How to structure multiple projects for bundling
How to create a package bundle using the
nugetcommand withnuspecmanifest
Example Project on GitHub
An example project for this article can be found here:
Creating NuGet Packages Series
This article is part of the Creating NuGet Packages series. If you enjoyed this one and want more, here is the complete list in the series:
Happy Coding!


